How to formulate a Face Wash – with Recipe

LAB NOTES & SAFETY NOTICE
These are personal experiments for educational use only— not instructions and not for commercial or consumer use. By proceeding, you assume all risks related to safety, testing, and regulatory compliance.
[Full Legal Disclaimer & Safety Requirements]

DIY Face Wash - Recipe

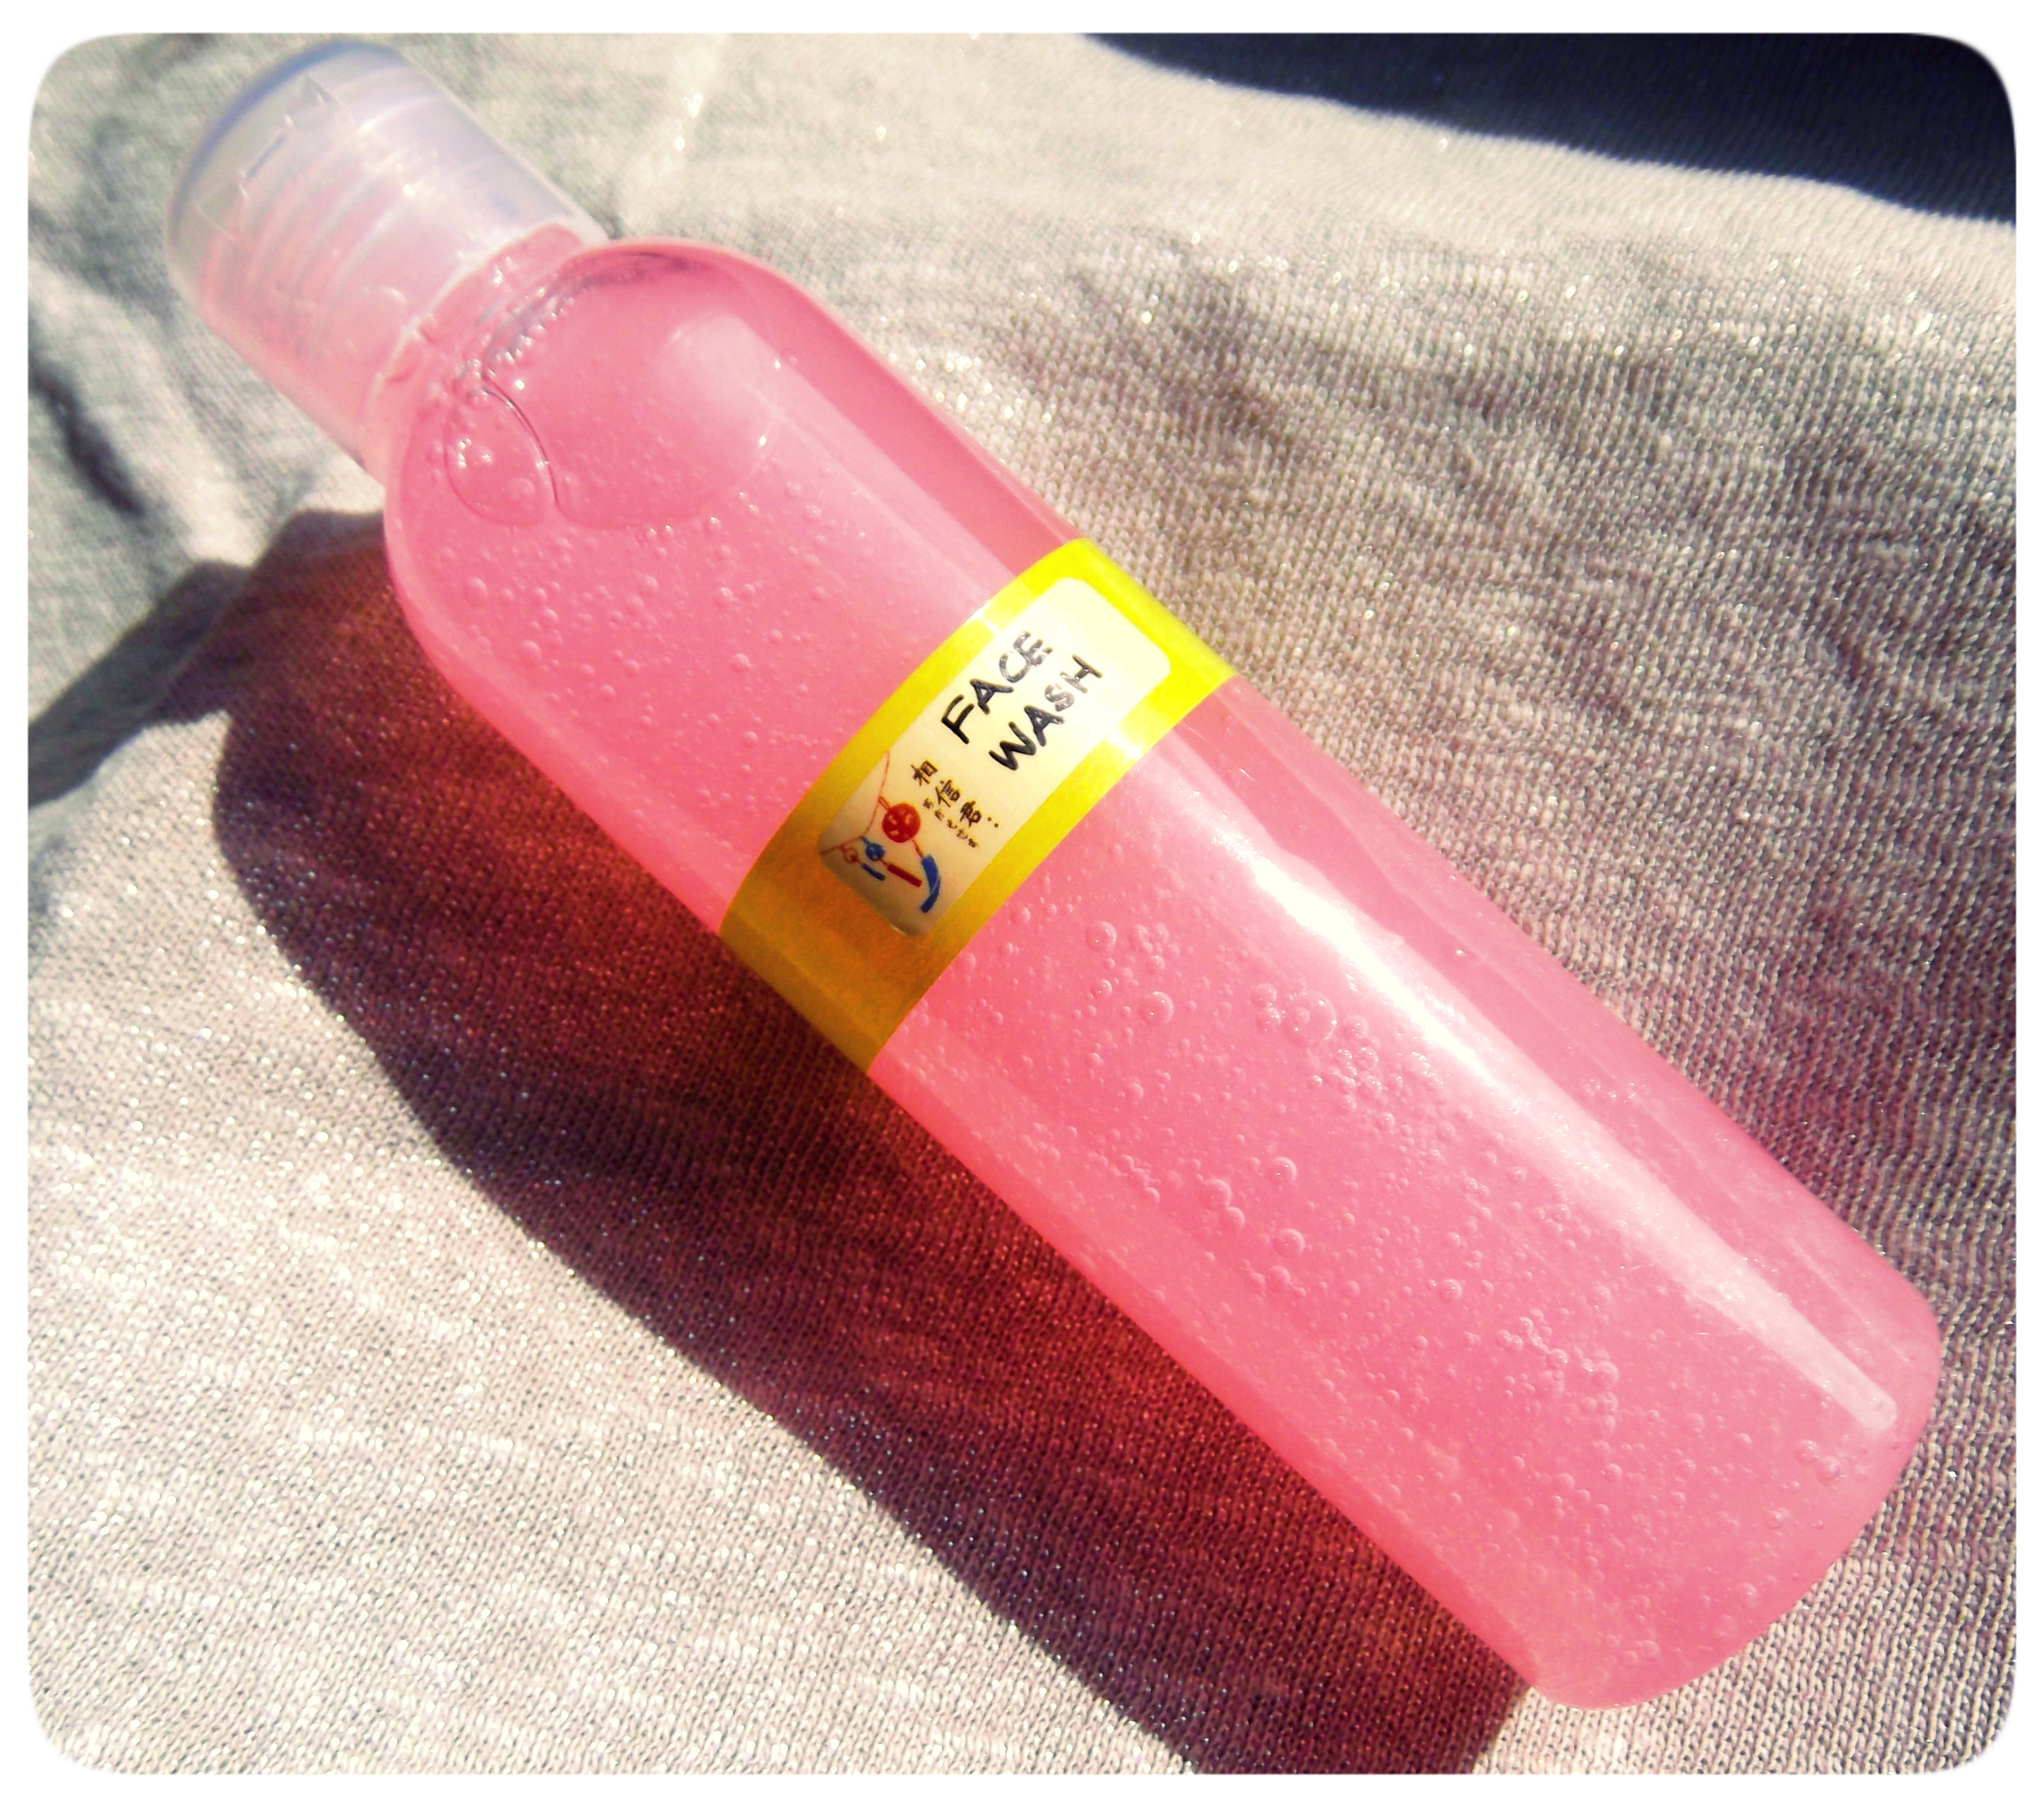
Today I experimented on an “extra-mild” facial cleanser. My goal here was to build a balanced Surfactant Trio (Anionic, Amphoteric, and Non-Ionic) but keep the concentration low enough to respect a compromised skin barrier—especially for my skin, which tends to get acne when it’s irritated.

The ASM Calculation & My Surfactant Logic

To make sure this was as gentle as possible, I targeted a total ASM of 6.5%. Most store-bought face washes are 10–15%, so I knew this would be much softer.

  • Sodium Lauroyl Sarcosinate (Anionic): My primary choice for a creamy lather. It’s so much milder than SLES or SLS.

  • Cocamidopropyl Betaine (Amphoteric): I included this to “buffer” the Sarcosinate. It helps stop the cleanser from being too aggressive on the skin.

  • Lauryl Glucoside (Non-Ionic): This completes the trio. It’s great for removing oily residues without causing irritation.

The Math (Validated against my 6.5% ASM target):

  • Sarcosinate 10g: 10 * 0.29 = 2.9g

  • Betaine 6g: 6 * 0.32 = 1.92g

  • Lauryl Glucoside 3g: 3 * 0.52 = 1.56g

  • Total ASM: 6.38% (Perfect!)


My Formula: Mild Face Wash

Phase Component % / grams Function
A Distilled Water to 100 Solvent
A Glycerin 3.0 Humectant
A Xanthan Gum 0.5 Thickener / Suspension
B Sodium Lauroyl Sarcosinate 10.0 Primary Mild Anionic
B Lauryl Glucoside 3.0 Non-Ionic Detergent
B Lavender & Sage EOs 4 drops Soothing / Antimicrobial
C Cocamidopropyl Betaine 6.0 Amphoteric Buffer
C Preservative & Lactic Acid q.s. Safety / pH Calibration

What I Noticed During the Process

  • Gelling the Water: Sarcosinate is notoriously hard to thicken! I used 0.5% Xanthan Gum to give it enough “body” so it wouldn’t just run off my hands.

  • The “Heat” Trick: My Lauryl Glucoside was a thick paste. I had to give it a quick warm-up in a water bath to liquefy it before mixing, otherwise, I would have ended up with “fish-eyes” (lumps) in my gel.

  • The “Slow-Mix” Rule: Sips water. I stayed away from the high-speed mixers. I just used a manual stirring motion because I didn’t want to turn my beaker into a bubble bath before I even finished!

  • The pH Moment: This is the most sensitive part. I used Lactic Acid to bring the pH down to 5.0.

    • My Observation: At pH 5.5, the Sarcosinate reaches its best density. But I have to be careful—if the pH drops much lower than that, the whole structure can fail and turn back into a liquid mess, plus the betaine should never go below that pH!

Final Thoughts

For me, this face wash is the definition of “Less is More.” By getting rid of harsh alcohols and scrubs and using this low-ASM blend instead, I finally gave my skin some space to breathe.

Personal Observation: This formula was a real turning point for my skin. It really confirms my theory: cleaning the skin shouldn’t mean stripping the skin.

DIY face wash

On Surfactants and Formulation (face wash, shampoo and shower gels)

LAB NOTES & SAFETY NOTICE
These are personal experiments for educational use only— not instructions and not for commercial or consumer use. By proceeding, you assume all risks related to safety, testing, and regulatory compliance.
[Full Legal Disclaimer & Safety Requirements]

Lab Notes: The ASM Reality

After spending so much time with surfactants, it’s clear that formulating a detergent isn’t about the volume of the bottle, but about the ASM (Active Surfactant Matter). It’s a core lesson: since raw surfactants are usually sold as solutions (mostly water), the only way to know the real “cleaning power” is to calculate the active part of the molecule.

What I’ve Learnt About ASM Targets

The ASM Protocol — Quantitative Detergent Design

In surfactant chemistry, we do not formulate based on the “volume of the bottle” but on the Active Surfactant Matter (ASM). Since raw surfactants are sold as aqueous solutions (e.g., 30% active matter and 70% water), we must calculate the true concentration of the “cleaning” part of the molecule to ensure safety and efficacy.

1. The ASM Target Reference

Before calculating, I define the target ASM based on the physiological needs of the area being cleansed. High ASM provides more “bubbles” and stripping power, while low ASM preserves the lipid barrier.

Product Type Target ASM Range Formulation Goal
Face / Intimate Wash < 10% Ultra-delicate; avoids stripping the acid mantle.
Shampoo 10% – 15% High wetting ability; removes sebum/styling products.
Shower Gel 15% – 20% Standard body cleansing; good foam volume.
Bubble Bath 20% – 25%+ Maximum foam stability; not intended for direct skin contact.

2. The Mathematical Approach: Solving for ASM

I utilize two primary methods in the lab to reach my target (e.g., a 18% ASM Shower Gel).

Method A: Quota Division (Precise)

I decide exactly what “share” each surfactant contributes to the total 18% and solve for the grams needed.

  • Sarcosinate (29% ASM): Quota 10% then I calculate: 10 / 0.29 = 34.48g

  • Betaine (36% ASM): Quota 5% so: 5 / 0.36 = 13.88g

  • Lauryl Glucoside (52% ASM): Quota 3% so: 3 / 0.52 = 5.76g

  • Total ASM = 18%

Method B: Gram Estimation (Iterative)

I estimate the grams first and check the result against the target.

  • 40g { Sarcosinate}* 0.29 = 11.6g

  • 15g { Betaine} * 0.36 = 5.4g

  • 5g { Lauryl Glucoside} * 0.52 = 2.6

  • Total ASM = 19.6% (Adjust grams downward to reach 18%).

3. Raw Material Profiles & Behavioral Notes

  • Sodium Lauroyl Sarcosinate (Anionic – 29%): Eco-friendly and creamy. Viscosity is highly dependent on a pH of 5.0. It is sensitive to oils and fragrances, often requiring Xanthan Gum for stabilization.

  • Cocamidopropyl Betaine (Amphoteric – 30-38%): The “Buffer.” When paired with Anionics (like SLES), it creates a salt-thickening curve. It significantly reduces the irritation potential of harsher surfactants.

  • Lauryl Glucoside (Non-Ionic – 52%): A thick, cloudy paste. Excellent for thickening and skin-mildness, but requires gentle heating ($40^\circ\text{C}$$50^\circ\text{C}$) to become workable.

  • Disodium Cocoamphodiacetate (Amphoteric – 38%): The “Baby” surfactant. Does not trigger the ocular sting reflex; ideal for “no-tears” formulations.

Researcher Summary

Calculating ASM is the only way to ensure reproducibility in the lab. By mastering this math, I can hopefully swap one surfactant for another (e.g., replacing SLES with a more eco-friendly Sarcosinate) while maintaining the exact same “strength” of the detergent.

How to formulate a detergent – THEORY pt.2

LAB NOTES & SAFETY NOTICE
These are personal experiments for educational use only— not instructions and not for commercial or consumer use. By proceeding, you assume all risks related to safety, testing, and regulatory compliance.
[Full Legal Disclaimer & Safety Requirements]

How to formulate a detergent

My Lab Notes: Surfactant Assembly & Phase Logic

Hello Hello! 😀

I’ve been recording my experiments with detergents, and I’ve realized it’s about so much more than just getting the skin clean. It’s about managing the “Micellar structure” so the product feels professional.

1. My “Trio-Strategy” for Softness

I’ve documented that a single-surfactant system is usually too harsh for my skin. I’ve started using a three-part team:

  • Primary: My “cleaning engine” (like SLES).

  • Secondary: A “buffer” like Cocamidopropyl Betaine to reduce irritation.

  • Aesthetics: A tiny bit of Glyceryl Oleate to make the lather feel like luxury.

2. My Thickening Observations

I’ve noticed that people associate thickness with quality, so I’ve been testing three reliable ways to build “body”:

  • The Salt-Curve: I’ve recorded that SLES becomes extremely dense when I add electrolytes (salt) because it forces the micelles to pack tighter.

  • The pH Trigger: In my experiments with Sarcosinate, the texture changes completely at pH 5.0. It goes from thin to thick almost instantly!

  • Polymeric Support: If the surfactants are being stubborn, I use Xanthan Gum (<1%) in Phase A to get the flow I want.

3. My Assembly Protocol (Avoiding the “Crash”)

I have to be very careful with the order of addition to avoid “crashing” the formula or making it cloudy.

  • Phase A (The Aqueous Foundation): I hydrate my gums and glycerin here.

  • Phase B (The Concentrate): This is where my main surfactants go. Sips water. I’ve learned to mix these very slowly with a spatula—no immersion mixers allowed, or I’ll end up with a beaker full of air bubbles!

  • Phase C (The Trigger): This is my favorite part. When I add the Betaine and the pH adjusters at the end, I often see the “thickening moment” happen right before my eyes.

Final Lab Thought

Formulating detergents is a game of patience. If I rush the mixing, I lose the clarity. A thin gel still cleans, but I’ve found that a thick, glossy gel is what makes the experience feel truly professional. It’s all in my hands! 😉

HAVE A GREAT DAY! 😄

How to formulate a detergent – THEORY pt. 1

How to formulate a detergent

LAB NOTES & SAFETY NOTICE
These are personal experiments for educational use only— not instructions and not for commercial or consumer use. By proceeding, you assume all risks related to safety, testing, and regulatory compliance.
[Full Legal Disclaimer & Safety Requirements]

My Lab Notes: Surfactant Theory & The Chemistry of Cleansing

Hello Hello! 😀

I’m recording my research into surfactants (Surface Active Agents). These are the amphiphilic molecules that make my cleansers work. Their “water-loving” head and “oil-loving” tail are what allow them to lift debris from the skin.

1. The Four Groups (My Personality Map)

Surfactants can be categorized by their electrical charge. It’s the easiest way to predict how they’ll interact with skin and hair:

  • Anionic (-): My “powerhouses” for foam and cleaning (SLES, Sarcosinate).

  • Cationic (+): I use these for conditioning because they “stick” to the negatively charged hair shaft.

  • Non-Ionic (0): Usually mild stabilizers (Glucosides).

  • Amphoteric (+/-): My “buffers.” I’ve found these are essential for reducing the irritancy of the Anionics (Betaine).

2. The ASM Calculation (Active Matter)

I’ve documented a common trap: raw surfactants are rarely 100% pure. They are usually solutions.

  • The ASM Coefficient: Always check my supplier’s sheet. For instance, if my SLES is 27% ASM, I have to calculate my formula based on that “pure” percentage, not the total weight of the liquid.

My Target ASM Hierarchy:

Based on my trials, I’ve set these “strength targets” for my formulas:

  • Intimate Wash: ~5% ASM

  • Face Wash: <10% ASM

  • Shampoo: 10% – 15% ASM

  • Shower Gel: 18% – 20% ASM

  • Bubble Bath: 20% – 25% ASM

3. The Synergy Discovery

One of the most important things I’ve recorded is that synergy reduces irritancy.
Using 12% ASM of a single surfactant is much harsher than a 12% blend of three different types. I now always use a “Trio” (Primary + Buffer + Aesthetic Booster) to keep the skin barrier happy.

Self note: It’s important that I keep checking the Technical Data Sheets. Sometimes the same ingredient can vary between 27% and 30% ASM depending on the batch!

It’s all about layering the charges correctly to get a product that cleans without being aggressive.

How to formulate a SERUM

Hyaluronic Acid Serum

LAB NOTES & SAFETY NOTICE
These are personal experiments for educational use only— not instructions and not for commercial or consumer use. By proceeding, you assume all risks related to safety, testing, and regulatory compliance.
[Full Legal Disclaimer & Safety Requirements]

This post is a great way to show how formulation shifts when you move from “heavy” emulsions to “active-heavy” serums. In 2026, the trend is all about “minimalist science,” so framing this as your Technical Brief on Aqueous Systems is perfect.

Here is the “Studio” revamp, using the Lab Notes persona.


Lab Notes: Observations on Aqueous Systems & Serum Theory

In my formulation research, serums represent a distinct category of product design. While lotions are designed for barrier protection and emollience, serums are engineered as high-delivery systems for specific active components. Below are my documented observations on the characteristics and structural theory of these fluid systems.

Defining Characteristics of a Serum

In my lab records, I categorize a “Serum” based on these specific technical parameters:

  • Lipid Load: Systems are typically very light, with a total fat content often documented between 1.5% and 4%.

  • Viscosity ($\eta$): Serums are designed to be fluid or semi-fluid rather than high-viscosity creams.


  • Active Density: They are formulated to hold a higher concentration of “hero” ingredients.


  • Cold Process Theory: Because the lipid load is so low, many of my serum experiments are conducted at room temperature (Cold Process), preserving the integrity of heat-sensitive vitamins.

Theory Perspective: If a cream is the “protector” of the skin, a serum is the “booster.” Expecting a serum to provide the same occlusion as a rich cream is a common misconception in formulation theory; they serve different physiological goals.


Structural Phases in Serum Design

Phase A: The Aqueous Base

Phase A is the backbone of the serum. In my experiments, I focus heavily on the choice of Rheology Modifiers (gelling agents) to determine the “pick-up” and “after-feel” of the product.

  • Robustness: I prioritize gelling agents that can withstand high electrolyte (salt) loads from actives.

  • My Go-To Polymers: I often record the use of Xanthan Gum or Hydroxyethylcellulose (HEC). Note that HEC requires a thermal trigger to hydrate, which I account for in my processing notes if cold-sensitive actives are involved.

Phase B: The Targeted Lipid Phase

Even in a water-heavy system, a small lipid phase is often necessary to carry oil-soluble vitamins (like Vitamin E/Tocopherol).

  • Solubilization vs. Emulsification: In my lab, when the oil phase is under 2%, I often experiment with solubilizers (surfactant-based materials) rather than traditional waxes. This allows the final system to remain translucent and liquid.

  • Cold Emulsifiers: For serums, I frequently document the use of liquid, room-temperature emulsifiers to maintain a “Cold Process” workflow.

Phase C: The Active Integration

In serum theory, the line between Phase A and Phase C is often blurred. Since many serums are cold-processed, I can incorporate the actives directly into the water phase from the start.

Hyaluronic Acid: The Dual-Purpose Ingredient

I’ve found that Sodium Hyaluronate is a fascinating case study in serum design. It acts simultaneously as a high-performance active and a gelling agent. In my records, I’ve noted that a high-molecular-weight Hyaluronic Acid can create a complete serum structure on its own, requiring nothing more than water and a preservative.


Concluding Thoughts on Serum Strategy

Designing a serum is an exercise in precision. Because the formula is so “exposed” (lacking the heavy waxes of a cream), every ingredient must be perfectly balanced to avoid tackiness or instability. I find these systems to be the ultimate test of an active ingredient’s compatibility with a base.

What’s next in the lab?

I am currently reviewing my notes on Niacinamide stability within these aqueous systems. If you have specific observations on pH-sensitive actives in serums, I’d love to compare data!

How to make foot & hand cream: formulating!

LAB NOTES & SAFETY NOTICE
These are personal experiments for educational use only— not instructions and not for commercial or consumer use. By proceeding, you assume all risks related to safety, testing, and regulatory compliance.
[Full Legal Disclaimer & Safety Requirements]

DSCF3497

Formulating a Protective Barrier Cream (Hands & Feet)

In this experimental batch, I am documenting the creation of a high-lipid barrier cream designed for hands and feet. These areas require a specific “Heavy Emollient” profile—thick, protective, and highly hydrating. My goal was to achieve a 25% lipid load while maintaining a stable, professional texture.

Phase A: Rheology and Electrolyte Stability

In my lab notes, the choice of gelling agent for this formula was dictated by the active ingredients in Phase C.

  • Distilled Water: to 100

  • Glycerin: 4.0% (Increased humectant levels for extreme dryness).

  • Xanthan Gum: 0.5% Technical Observation: I opted for a relatively high percentage of Xanthan Gum as the sole stabilizer. I purposely avoided Carbomer polymers because the high concentration of Urea (an electrolyte) in Phase C would compromise the carbomer’s lattice, leading to viscosity loss.

Phase B: The Heavy “Grease-Fall” and Protective Waxes

For a hand/foot treatment, the lipid profile shifts toward the “heavy” end of the Gaussian distribution.

  • The Lipid Cascade: I prioritized hard butters (Cocoa and Shea) to provide structure and occlusion.

  • The Role of Waxes: I’ve introduced Jojoba Wax at 2%. Waxes are not strictly part of the “Grease-Fall” fluidity; instead, they function as film-formers, providing a protective “glove” effect against environmental stressors.

Experimental Oil Phase (25% total fats):

  • Jojoba Wax: 2.0%

  • Cocoa Butter: 5.0%

  • Shea Butter: 10.0%

  • Argan Oil: 5.0%

  • Grape Seed Oil: 5.0%

Phase C: Managing Urea and pH Stability

Phase C contains the “Hero” ingredients, but they require careful chemical management.

  • Urea (10%): A potent humectant known for its water-binding and keratolytic (exfoliating) properties.

  • Gluconolactone (2%): In my research, Urea is known to cause a pH drift (becoming more alkaline over time). To counter this, I’ve included Gluconolactone as a buffering/sequestering agent to maintain pH stability.

  • Texture Modifier: I added Aluminum Starch Octenylsuccinate (1%) to mitigate the greasiness of the 25% fat load, resulting in a matte, “velvet” after-feel.


My Batch Processing Workflow

  1. Hydration: I dispersed the Xanthan Gum in Glycerin before adding the water (setting aside 15g for the urea solution).

  2. Thermal Phase: Both Phase A and Phase B were heated to 70°C.

  3. Emulsification: Phase B was incorporated into Phase A in three stages using an immersion mixer.

  4. Urea Integration: Once the emulsion cooled to room temperature, I dissolved the Urea and Gluconolactone in the reserved 15g of water and integrated this into the base.

  5. Final Finish: I added the preservative, essential oils (Grapefruit and Mint), and a touch of food-grade coloring for aesthetic appeal.

Final QC Check: The pH was measured and found to be stable between 5.5 and 6.0.

Formulating lotion: Phase C & ACTIVE INGREDIENTS- THEORY pt.6

LAB NOTES & SAFETY NOTICE
These are personal experiments for educational use only— not instructions and not for commercial or consumer use. By proceeding, you assume all risks related to safety, testing, and regulatory compliance.
[Full Legal Disclaimer & Safety Requirements]

My Lab Notes: Phase C—The “Cool Down” & Active Ingredients

Hello Hello! 😀

If Phase A and B are the “body” of my cream, then Phase C is the personality! This is the “Cool Down” phase where I add all the fun stuff, but it’s also the part that makes me the most nervous. Why? Because most of these ingredients are total divas—they hate heat!

The “Waiting Game” Protocol

Sips water. Patience is everything here. I’ve learned that I absolutely have to wait until my emulsion drops below 40°C. If I get impatient and add things too early, I’m basically just cooking my expensive actives!

  • My Checklist: I usually keep my total “active load” under 10% to make sure the emulsion stays stable and doesn’t get “cranky.”

1. The “Antioxidant Cocktail” Theory

I’ve been reading that it’s better to use a team of antioxidants rather than just one.

  • My Observation: Mixing Vitamin E (Tocopherol) with something like Resveratrol seems to create a much stronger defense. It’s like they protect each other while they protect the oils in my cream!

2. Acids & The pH Balance

I use things like Lactic or Citric acid to either exfoliate or just fix the pH.

  • Safety Note: My notes are very strict about this—if I use chemical exfoliants like Salicylic acid, those batches are for NIGHT USE ONLY. I don’t want to mess with photosensitivity!

3. Niacinamide: The “Flushing” Constraint

Niacinamide is a hero in my oily-skin research (I usually use 1–4%), but it has a very specific rule: pH 5.0 to 5.5. * The Risk: I’ve documented that if the pH goes too high or too low, it can turn into Nicotinic Acid. If that happens… PHEW! It can cause the skin to flush and turn red. Not what I’m going for! 😀

4. Soothing & The “Grit” Problem

I love adding Panthenol (B5) and Allantoin for that soothing feeling.

  • Lab Lesson: Allantoin is a tricky one! It only dissolves at 0.4%. I’ve had batches where I used too much and ended up with “grit” in the cream. It felt like a scrub instead of a lotion! Now I’m much more careful with my measurements.

5. Eye Area Experiments (The Caffeine Boost)

For my eye creams, I’ve been experimenting with Caffeine and Escin. They are fascinating because of their “vasoprotective” properties—basically trying to help with puffiness and drainage.

**The “Reality Check” on Sourcing 😉 **

This is where my inner detective comes out. Marketing can be so deceptive!

  • The Q10 Case Study: Pure Coenzyme Q10 is a bright, intense yellow. Even at 0.1%, it turns the cream yellow.

  • My Thought: When I see a “Pure White” Q10 cream in a store, I just smile and shake my head. I know the concentration must be almost zero!

  • Check the SDS: I’ve learned to always check the Safety Data Sheet. “Liquid Q10” is often mostly filler with just a tiny bit of the real stuff. I want to know exactly what I’m putting in my beakers!

It really is a science, and every time I cool down a batch, I feel like I’m learning a new secret. It’s all in my hands! 😉

HAVE A GREAT DAY! 😄